This is the manual on how to install and use the blueprint for the Everything Presence Lite.
You can download the blueprint here
How to install the blueprint for the Everything Presence Lite.
- Copy this blueprint to your /config/blueprints/automation/smarthomejunkie folder
- After uploading the blueprint, go to Developer Tools > YAML tab and click AUTOMATIONS
Fields in the Blueprint
The blueprint contains the following fields:
| Name | Type | Default | Example | Description |
| Turn Off Delay | Number | 300 | The delay time in seconds before a light should turn of after presence is no longer detected in a zone | |
| Target 1 X | Dropdown | Everything Presence Lite 307c10 Target 1 X | Select the Target 1 X entity of the EPL | |
| Target 1 Y | Dropdown | Everything Presence Lite 307c10 Target 1 Y | Select the Target 1 Y entity of the EPL | |
| Target 2 X | Dropdown | Everything Presence Lite 307c10 Target 2 X | Select the Target 2 X entity of the EPL | |
| Target 2 Y | Dropdown | Everything Presence Lite 307c10 Target 2 Y | Select the Target 2 Y entity of the EPL | |
| Target 3 X | Dropdown | Everything Presence Lite 307c10 Target 3 X | Select the Target 3 X entity of the EPL | |
| Target 3 Y | Dropdown | Everything Presence Lite 307c10 Target 3 Y | Select the Target 3 Y entity of the EPL | |
| Zone 1 Light | Dropdown | Livingroom Lightbulb 1 | Select the light that should switch in Zone 1 | |
| Zone 1 Position X Top Left | Number | 0 | 2800 | Enter the Top Left X position for Zone 1 |
| Zone 1 Position Y Top Left | Number | 0 | 2300 | Enter the Top Left Y position for Zone 1 |
| Zone 1 Position X Bottom Right | Number | 0 | 0 | Enter the Bottom Right X position for Zone 1 |
| Zone 1 Position Y Bottom Right | Number | 0 | 0 | Enter the Bottom Right Y position for Zone 1 |
| Zone 2 Light | Dropdown | Livingroom Lightbulb 2 | Select the light that should switch in Zone 2 | |
| Zone 2 Position X Top Left | Number | 0 | 2800 | Enter the Top Left X position for Zone 2 |
| Zone 2 Position Y Top Left | Number | 0 | 5000 | Enter the Top Left Y position for Zone 2 |
| Zone 2 Position X Bottom Right | Number | 0 | 0 | Enter the Bottom Right X position for Zone 2 |
| Zone 2 Position Y Bottom Right | Number | 0 | 2400 | Enter the Bottom Right Y position for Zone 2 |
| Zone 3 Light | Dropdown | Livingroom Lightbulb 3 | Select the light that should switch in Zone 3 | |
| Zone 3 Position X Top Left | Number | 0 | -100 | Enter the Top Left X position for Zone 3 |
| Zone 3 Position Y Top Left | Number | 0 | 2700 | Enter the Top Left Y position for Zone 3 |
| Zone 3 Position X Bottom Right | Number | 0 | -5000 | Enter the Bottom Right X position for Zone 3 |
| Zone 3 Position Y Bottom Right | Number | 0 | 0 | Enter the Bottom Right Y position for Zone 3 |
| Zone 4 Light | Dropdown | Livingroom Lightbulb 4 | Select the light that should switch in Zone 4 | |
| Zone 4 Position X Top Left | Number | 0 | 0 | Enter the Top Left X position for Zone 4 |
| Zone 4 Position Y Top Left | Number | 0 | 0 | Enter the Top Left Y position for Zone 4 |
| Zone 4 Position X Bottom Right | Number | 0 | 0 | Enter the Bottom Right X position for Zone 4 |
| Zone 4 Position Y Bottom Right | Number | 0 | 0 | Enter the Bottom Right Y position for Zone 4 |
How to define your zones for the Everything Presence Lite.
The zones are defined relative to the position of your EPL. The X and Y coordinates of the zones should be entered in millimeters. So, 3 meters should be entered as 3000.
The EPL is at the following coordinates:
- X = 0
- Y = 0
If you place the EPL on a flat surface, then everything to the left of the EPL has a positive X coordinate. Everything to the right of the EPL has a negative X coordinate. If you hang the EPL upside down, then everything to the left of the EPL has a negative X coordinate and everything to the right of the EPL has a positive X coordinate.
See the following example where I defined two zones. Zone 1 is left of the EPL and Zone 2 is right of the EPL. Both zones are 3 meters by 2.8 meters in size.
- The EPL is at the coordinate (0,0)
- Zone 1 Top Left is at coordinate (3000,2800)
- Zone 1 Bottom Right is at coordinate (0,0)
- Zone 2 Top Left is at coordinate (0,2800)
- Zone 2 Bottom Right is at coordinate (-3000,0)
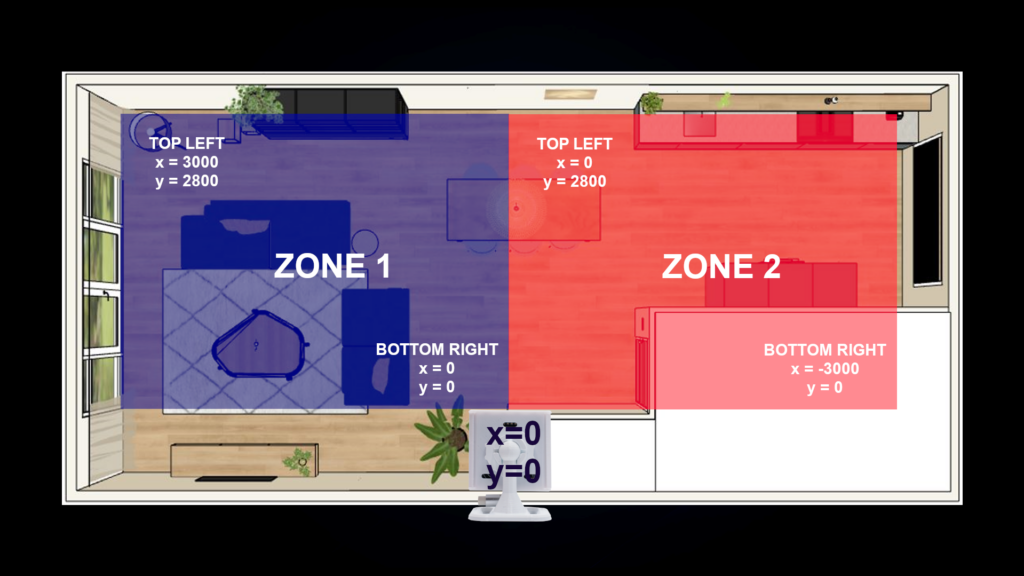
Note: the blueprint doesn’t really care about which corners you define for your zones. It will automatically determine the zone as long as you define two opposite corners. It is however best to follow the guidelines like the one in the picture above.
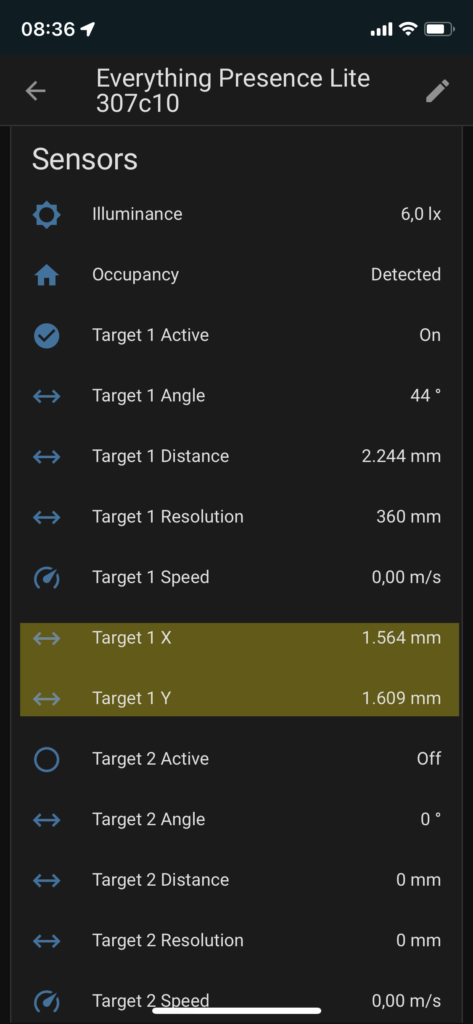
How do I test my current X and Y Positions?
To test at what position you are standing:
- Open the Home Assistant Companion App.
- Go to Settings.
- Go to Devices and Services.
- Click the Devices tab.
- Click the Everything Presence Lite.
- Scroll down until you see the Target 1 X and Target 1 Y sensors.
- The value of those sensors shows where you are standing in the room.