
In this Home Assistant tutorial, I share my most valuable Home Automation with you: a fully automated Garden Watering or Irrigation System that takes into account the outside temperature of the past few days, the rainfall of the past few days, and the rain forecast for the next 24 hours. It’s by far the most valuable automation I’ve ever made in Home Assistant. I’ve been using this for over two years now and in that time I’ve made it so that it works perfectly. This tutorial contains so much juice. I teach you about Helpers, Automations, Scripts, and how to make your own template sensors. If you use Home Assistant and want to automate your garden sprinkler to water your garden, this is a MUST-SEE tutorial for you! It will definitely blow your mind!
⭐⭐⭐ NOTE: ⭐⭐⭐
This article accompanies a YouTube video. I wrote it for people who would rather read than watch a video. To keep doing this, I want to ask you to check out the video, leave a comment under the video, give the video a thumbs up, and subscribe to my YouTube channel. This means that the video is offered more often to new visitors so that they also stay informed of the latest Home Assistant tutorials.
Thank you for your support!
Ed
You can download the code used in this video here so that you can just copy and paste it to get it to work.
The Use Cases
Let’s start with the use cases:
The Starting Points
- Water the garden in the morning at sunrise
- The maximum days of monitoring the temperature and rain fallen are 3
- Reset all the values every three days if watering the garden was not needed
- Reset all the values after watering the garden
- Monitor the rain that has fallen in recent days
- Monitor the rain that will fall in the next 24 hours
- Monitor the maximum temperature of the past days
When should we water the garden?
- When 1 day is over:
- Check if the temperature has been above 31 °C
- If so, water the garden for 90 minutes
- When 2 days are over:
- Check if the temperature has been between 26 °C and 31 °C
- Check if the rain that has fallen plus expected rain is equal to or below 15 mm
- If so, water the garden for 75 minutes
- When 3 days are over:
- Scenario 1:
- Check if the temperature has been between 21 °C and 26 °C
- Check if the rain that has fallen plus expected rain is equal to or below 10 mm
- If so, water the garden for 60 minutes
- Scenario 2:
- Check if the temperature has been between 15 °C and 21 °C
- Check if the rain that has fallen plus expected rain is equal to or below 10 mm
- If so, water the garden for 45 minutes
- Scenario 1:
- Do not water the garden if the temperature has been lower than 15 °C for the past 3 days
What do we need? – Helpers
- input_number: Maximum Temperature Measured
- input_number: Total Rain Fallen
- input_number: Watering Duration
- input_datetime: Last Watering Day
What do we need? – Sensors
- Openweathermap Rain
- Openweathermap Temperature
- Openweathermap Forecast Precipitation
- Openweathermap Forecast Precipitation Probability
- Current Temperature Is Higher (Custom Sensor)
- Days Since Last Watering Day (Custom Sensor)
- Total Expected Precipitation (Custom Sensor)
- Total Rain Fallen Plus Expected (Custom Sensor)
What do we need? – Scripts
- Water The Garden
- Reset Helper Values
What do we need? – Automations
- Add Current Rain To Total Rain fallen
- Check If Garden Should Be Watered
- Check Maximum Temperature When Temperature Changes
Set up OpenWeatherMap
First, you have to set up the OpenWeatherMap Integration. You can do this in the integrations menu of Home Assistant. Set the refresh rate to hourly. See the video on how to set this up exactly.
Set up the Helpers
Now, set up the helpers as defined in the Use Cases. The video of this Home Assistant Tutorial shows exactly how to do that.
Set up the Template Sensors
After setting up the helpers, you can set up the template sensors. If you have never done this before, then watch the video.
You can download the code used in this video here so that you can just copy and paste it to get it to work.

I need your help!
You will be doing me a huge favor if you subscribe to my channel if you haven’t already. And, you will help me a lot if you also give this video a thumbs up and leave a comment. This way, YouTube will present this video to new people, making the channel grow! In the video description, you will also find information about how you can sponsor me so that I can continue to make these tutorials for you.
Thank you!
Set Up the Automations for this Home Assistant Tutorial
Now we’re going to set up the automations. You can watch the video from this point to see how to do this.
You can download the code used in this video here so that you can just copy and paste it to get it to work.
Set Up the Scripts
Next to the automations, we need scripts. You can check the video from this point to see how to do this.
You can download the code used in this video here so that you can just copy and paste it to get it to work.
Now, your Garden Sprinkler System is ready to run.
Check if the sprinkler still runs after Home Assistant restarts
Some people asked me what would happen if Home Assistant reboots during watering. In that case, the sprinkler would go on until the next time that the sprinkler timer is triggered, but you can easily circumvent this:
Create an automation that checks if the sprinkler is still running if Home Assistant is rebooted and stops the sprinkler if that is the case.
You can download the code used in this video here so that you can just copy and paste it to get it to work.
The Monitoring dashboard for this Home Assistant Tutorial
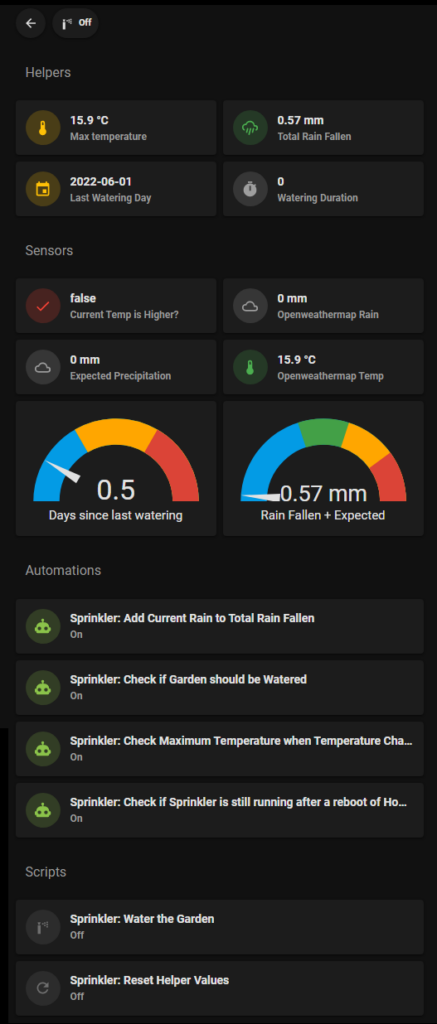
Here’s the dashboard code. You need to have mushroom cards and the custom layout card installed through HACS to make this work.
You can download the code used in this video here so that you can just copy and paste it to get it to work.
Read more blog articles on the blog page!