

Hi there!
Home Assistant supports tags which are really handy to trigger automations. For instance, you can trigger a song to play, check in and out of your house, or arm and disarm your alarm system. When I created my alarm system in Home Assistant, I really missed an option to arm and disarm this with tags. In this video, I will show you how you can build a perfect NFC tag reader and use it to control your alarm system.
⭐⭐⭐ NOTE: ⭐⭐⭐
This article accompanies a YouTube video. I wrote it for people who would rather read than watch a video. To keep doing this, I would like to ask you to check out the video, leave a comment under the video, give the video a thumbs up, and subscribe to my YouTube channel. This means that the video is offered more often to new visitors so that they also stay informed of the latest Home Assistant tutorials.
Thank you for your support!
Ed
Introduction
I have been using my Home Assistant alarm system for several years now and I must say that I am quite satisfied with it. There is only one thing that bothered me. That was that I always had to switch the alarm system on and off via the Home Assistant dashboard. That does not work well for the Wife Acceptance Factor because it was difficult for my children and the household help.
I would prefer to use a tag reader that hangs near my door. With this, I can easily switch the alarm system on and off by moving a tag along it when I leave or enter the house. My old “dumb” alarm system did have this and it worked very well. I would also like to give separate tags to my children and the household help so that I can immediately see who set the alarm and what time they came home or left. So, let’s build a perfect NFC Tag reader in Home Assistant.
The needed components
I searched online for a tag reader that is compatible with Home Assistant, but was unsure whether I was buying the right device. During my search, I came across this site, which contained a schematic and ESPHome code to build a tag reader myself.
All the credits go to this awesome guy Andrea Donno, who created this and made it possible to build your own NFC Tag reader.

I also happen to like to tinker, so I thought: let’s do this!
Shopping list to build the NFC Tag reader
I ordered all parts online. (See the links to the articles in the description).
Here are the parts you’ll need to build your NFC tag reader:
The Diagram
The diagram looks like this:
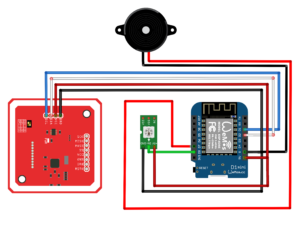
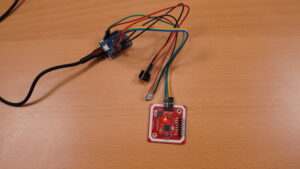
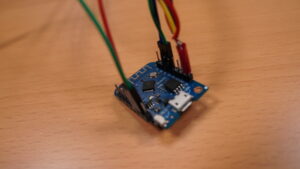
The D1 Mini is the central heart of the tag reader. This is the mini-computer that reads the signals from all components and controls the components.
On the D1 Mini, I soldered some connector pins so that I could easily connect the DuPont cables to it to test everything. After everything is tested and working properly, I will solder the cables directly to the D1 Mini.
Build the NFC Tag reader
From the NFC reader, the Ground, Voltage, Serial Data Line, and Serial Clock are connected to the D1 Mini. I did that with the four DuPont cables that came with the NFC reader. Yes, I know, I didn’t use the correct colors for the voltage and ground. Of course, that should have been red and black, but I didn’t have them available at the time. 🙄
Set the dip-switches on the NFC reader as follows:
- Switch 1: On
- Switch 2: Off

This enables the NFC reader to communicate with the D1 mini over I2C, and is required for the modules to work together!
Connect the LED
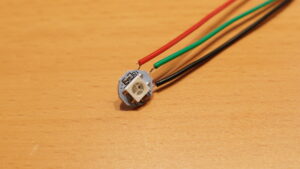
After connecting the NFC reader to the D1 mini, we also connect the LED module. We will create an automation later so that the LED turns off when the alarm is turned off, and turns red when it’s turned on, and flashes orange during the time you walk out or come in and still have to turn off the alarm.
Connect the Buzzer
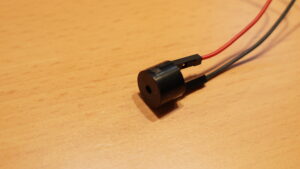
In addition, we connect a buzzer to the D1 Mini so that a sound is played when the alarm is activated or turned off. What’s really cool is that we can even play whole melodies through this buzzer. I’ve just created a beep tone, but you could also play a whole symphony on it if you’d like 🙂
Let’s start programming the D1 mini using ESPHome.
If you want to make prototypes or low volumes of your electronics projects, go to my sponsor PCBWay. As one of the most experienced PCB
manufacturers and SMT assemblers they can supply various PCBs, CNC, 3D print, assemble PCBs and even design your own PCBs. So, got to PCBWay to have your PCBs produced at competitive prices!
ESP Home
ESPHome is a system to control your ESP8266/ESP32 by simple yet powerful configuration files and control them remotely through Home Automation systems.
The entire list of devices that you can control with ESPHome is on this page.
There are different types of components such as air quality meters, distance meters, electricity meters, motion sensors, light meters, and much more.
For each component, you will find a configuration example that you can use when programming your ESP board. These configuration files set to which pins of your ESP board your component is connected so that it can be controlled via Home Assistant.
I can imagine this all sounds very challenging, but if you tinker with the sample files a bit, it quickly becomes clearer. I’m not going to get too deep into ESPHome right now, but let me know in the comments if you want to learn more about it. Then maybe I’ll make a video about it in the future.
To build the NFC Tag reader, Andrea Donno has made a very nice configuration script that contains a lot of functionalities that you can use in Home Assistant. I had to tweak it a little bit to make sure it worked well with my automations in Home Assistant.
Programming the D1 Mini
Let’s start programming the D1 Mini now!
To begin with, we need to make sure that ESPHome is installed in Home Assistant. I already installed it, but here’s how to install it.
Install ESPHome
Go to Settings > Add-ons and click on Add-on store. Now search for ESPHome, open it, and click Install.
Now check all options and click start.
You should see ESPHome in your menu bar on the left. Click ESPHome in the menu and the Web UI will launch. You may get a 502 error. That means ESPHome is still starting up, so feel free to try again after a few seconds.
As you can see I have already installed a number of ESP devices in my environment. We are now going to add the tag reader.
Editing the configuration file
We will now first adjust the configuration file so that our WiFi data is in it. I changed the original file of Andrea Donno a bit because of the automations that I am going to create later in this Tutorial. That’s why you need to download the configuration file here. You can also use Andrea Donno’s original file, but then my automation won’t work quite right.
You can download the configuration file from this site.
Now edit the config in a text editor to make sure your WiFi SSID and WiFi password are correct.
Remove the hashtags and enter your wifi SSID name and password.
Add the NFC Tag Reader to ESPHome
Then click on New Device and then click on continue.
Give your device a name. In my case, I enter tag-reader here.
Now choose ESP8266 on the next screen and click next.
You will now see that a new device has been added to ESPHome. Don’t click install yet, because we still need to enter the configuration code.
Now click on SKIP.
Now click on Edit and replace the code you see with the code you just downloaded and modified. Then click on SAVE and then on CLOSE.
Now let’s validate the code first. Click on the three dots within your tag-reader card and then on validate. If everything went well, if you scroll up, you will see a message at the top of the screen that the configuration is valid.
Now connect your D1 Mini to your computer or directly to the Home Assistant server via a data micro-USB cable. It’s way easier to connect your D1 Mini to your Home Assistant server, so I recommend you do that. Please note that your USB cable is really a data micro USB cable and not just a power cable!
Oh, and don’t worry, you only have to do this once. After flashing the D1 mini, it will connect via WiFi. You do not have to connect it to your Home Assistant server using a cable anymore.
Flash the D1 mini
Now click on Install
Depending on what you have connected your D1 Mini to, you choose the right option. In my case, it is connected to my Home Assistant server, so I choose Plug into the computer running ESPHome Dashboard.
ESPHome will now flash the D1 mini with the configuration image. This might take some time, so grab yourself a cup of coffee.

I need your help!
You will be doing me a huge favor if you subscribe to my channel if you haven’t already. And, you will help me a lot if you also give this video a thumbs up and leave a comment. This way, YouTube will present this video to new people, making the channel grow! In the video description, you will also find information about how you can sponsor me so that I can continue to make these tutorials for you.
Thank you!
After the installation is finished, you should now see that the D1Mini is connected. You can test whether your tag reader works by holding a tag in front of the reader and seeing if you get a response on the log screen.
Now if you go back to ESPHome, you will see a new green card with the tag reader information. Now click on adopt and then click on adopt again. Then click on skip. You can now remove the old tag reader card. Click on the three dots and click on DELETE.
Configure the NFC Tag reader in Home Assistant
We are now going to make sure that we can arm and disarm our Home Assistant alarm system with the tag reader. Go to Home Assistant>Settings>Devices and Services. You should now see that a new ESPHome device has been found.
Click Configure on the found device.
Click submit
You should now hear a beep on your tag reader. That means everything went well. Choose an Area for your tag reader and click Finish.
Let’s rename the Tag Reader first. To do this, go to tag reader with a number and click on Device. Click on the pencil and name the tag reader Tag Reader. Rename the entity names as well.
Register the tags in Home Assistant using the NFC Tag reader.
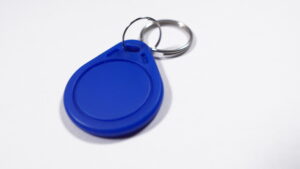
Two tags are included with the tag reader. We will now first register them in Home Assistant. To do this, go to Settings > Tags.
Now hold your tag close to the tag reader. If all went well, Home Assistant should now recognize your tag and see it appear in the list of tags.
Click on the gear next to the tag and give the tag a name. For example Tag 1. I already have a Tag 1, so I will now call it Tag 2.
If I hold the tag near the NFC Tag reader, you will see that it lights up in the overview.
Automations
We are now going to create the automations for our NFC Tag reader. I assume that you have installed my alarm system first, but this also works with Alarmo as long as you use the correct arming states in the automations.
Go to Settings > Automations & Scenes.
I have already made the automations and will walk you through them one by one. You can download the code for the automations here.
Let’s test the NFC Tag reader
Now it’s time to test our NFC Tag reader to see if it works with the alarm system.
Grab your tag and hold it close to the tag reader.
You will see that the alarm system jumps to Arming, that a beep comes from the speaker and that the LED starts flashing orange. When the arming time is over, you will see that the LED lights up red.
If you now hold the tag in front of the tag reader again, you will see that the alarm is disarmed. The LED will now go out.
If movement is detected while the alarm system is armed, you will see that the alarm system gets the status pending and that the LED starts flashing orange. During this state you can disarm the alarm by holding the tag in front of the tag reader again. the alarm is then deactivated before it actually goes off.
If the alarm goes off, you can also disarm it by holding the tag in front of the tag reader.
And finally, the LED and the speaker also respond if you do not use a tag reader, but the alarm is armed and disarmed via the alarm panel on the Home Assistant dashboard.
Credits
All credits go to Andrea Donno for creating the initial code and the scheme of the tag reader. If you do not want to build the NFC Tag Reader yourself, you can also buy the NFC Tag reader ready-made on the site of Andrea Donno.
Outtro
I have now created a problem for myself. I am afraid that I now have to buy a 3D printer to build a nice box around this NFC Tag reader.
But yes, if you are going to make multiple ESPHome devices, a 3D printer is quite a good addition to your Smart Home.
Do you have any advice for a good 3D printer? Let me know in the comments of the video!
I hope this video gave you some ideas to use a tag reader and possibly build it yourself. Let me know in the comments if it worked!
Your support allows me to make new videos all the time. You can support me by becoming my Patron, buying me a cup of coffee, or joining this channel. The links for this can be found in the description of this video.
Please don’t forget to give this video a thumbs up, subscribe to my channel, and check the notification bell.
I look forward to seeing you next time!
Bye bye.